
New Product: The Visual Devotional Workbook
July 15, 2016 § Leave a comment

You can buy this devotional starting Wednesday, July 20th, 2016 at Gateway Bookstore (Southlake, Texas) or on my website www.lifeonpaperco.com.
I am excited to announce the release of a Bible-centered workbook I have been busy designing—The Visual Devotional: A 21-Day Creative Journey Into Your Personal Quiet Time Style!
Here’s a little background….
When I was in first grade, I was diagnosed with Dyslexia. Because of that, books have never been my thing. I would read the first sentence of an article, the pull-out quotes, and that was about it. It was so hard knowing that the Creator of the universe wrote a book just for me, but then struggling to find the passion to read it. I had a great relationship with God, I just couldn’t relate to the two-hour quiet times my pastor would always talk about. I lacked the focus to do more than read a chapter in the Bible and then say, “OK, done.” and move on with my day.
It was then that the Lord pinpointed what was missing for me. I was not being creative with my quiet time. The one thing I know about myself—that I am creative—was not being released in the most intimate relationship I had. That is when God began speaking to me about going on a journey with Him into the world of devotionals. I knew from the beginning that as He showed me what to do, day by day, I would grow in deeper intimacy with Him.
So, this is not your average devotional with a set amount of scriptures to read and a questions to answer at the end. This is a more open-ended journey into finding what works for you. In fact, you pick what you want to read—anything from one verse to an hour or two of bible time is up to you! If you are meeting with God and learning something from His Word, the amount is not important.
There will be five consistent portions to each day’s worksheet and then a few creative elements to spice up your time. The five consistent elements are:
+ Bible Reading – Read about God
+ Prayer – Talk to God
+ Application – Apply what He says
+ Outreach – Apply what He says to others
+ Distraction Help – Clear your mind of busy-ness
At the end of each week, you can highlight some of the most effective tools that helped you communicate with God. When the 21 days are over, you can reuse your favorite tools over and over again. That way, as you continue your journey, you’ll remember what works for you!
Research shows that it takes 21 days to form a habit. I pray that as you take the next 21 days to creatively seek the Lord that you will be launched into a lifestyle of dynamic devotion!
You can buy this Devotional starting Wednesday, July 20th, 2016 at Gateway Bookstore (Southlake, Texas) or on my website www.lifeonpaperco.com.
Waste Not, Want Not
April 19, 2012 § 5 Comments
I’ve got some wonderful new followers that have inspired the following post!
There are two issues I wanted to discuss regarding the subject of running a business while be environmentally conscience — especially when my products and designs are all about PAPER.
I would ask that we all be aware of what and how many copies of printables we make and what kind of paper we print on. If at all possible, try to choose a recycled paper so that precious resources are not being wasted. I would also ask that when you are done with the printouts, please place them in a recycle bin. (unless you love my designs so much you decide to frame them, ha!) That way we our doing our best while also staying organized.
The other issue that has come up is the amount of ink my House Cleaning Worksheet uses on a home printer. If you print these at a print shop you will have no problem, but at home I know we would all like to stop buying those ridiculously overpriced little print cartridges so often. Hence, the easy solution: A less-ink version of my most popular design! Download the hi-resolution version here.
Enjoy! And thank you so much for your thoughtful input and encouraging notes. I love reading all of them!

Organizing my Child’s “Life on Paper”
March 27, 2012 § 4 Comments

It’s almost the end of the school year and I sit here staring at a giant pile of artwork from my daughter’s last year in preschool. What do I do with this mess?!? Er, I mean the beautiful masterpieces she creates on a daily basis…
I’ve actually developed a system that I think works like a charm!
For each child you have, go to the store and buy a bin that holds a large number of hanging file folders. Preferably, get the legal sized ones because artwork never seems to be 8.5×11. Then label the folders as follows:
– Pregnancy (Or adoption papers)
– School/Daycare Forms
– Receipts (for items you might want to return or have a warranty on)
– Vaccinations
– Doctor Visits
– A folder for each activity your child does (soccer, dance, etc.)
– And then a folder for every year until your child graduates from High School. This folder will mostly be for artwork, or as they get older, for really well done homework.
My mom also did an amazing thing that I would suggest to any parent. She kept a running Word document and every time a big event happened in my life or a significant illness or injury, she would add it to the document along with the date. That way I could look back on my life and see when everything happened— vacations, awards, broken arms and fun memories all documented for me to have for the rest of my life! If you can do this, make a file folder for that too.
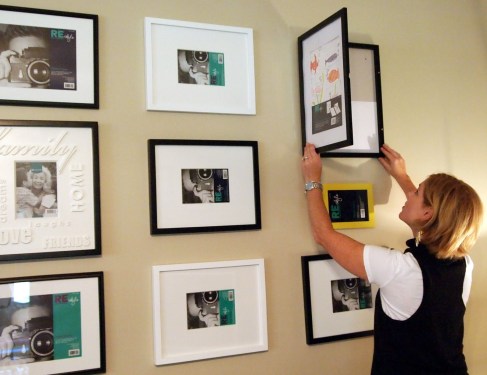
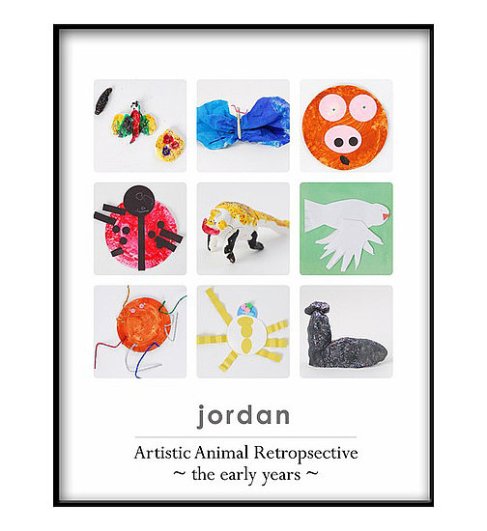
Then, find a place in your house off the beaten path to store that box, and every time your child(ren) come home from school just chunk that big collection of artwork from the day (after carefully admiring each detail, mind you) into a growing pile. After a month (or year… whatever you can stand), go through the art and pick the few pieces that go in your bin to remember and maybe one or two to frame or display in your house. I have found if I wait for a big collection of artwork to go through, it is easier for me to pick out the few best pieces to keep.
While browsing the internet, I found a few fun ideas and blogs about how to display the exceptional art pieces:
Children’s Artwork Display Solutions
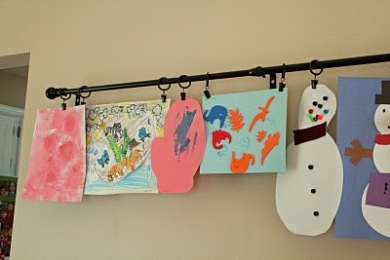
Ten Creative Ways to Display Children’s Art

Easily Change out your Child’s artwork with these frames
A Clock of Art by Dutch by Design

Have a book Made – By Artimus Art

Gallery Wall – Great blog post with classy ideas

Fun with Paper: Nursery Letters
April 13, 2011 § 4 Comments

When I was pregnant with my daughter I decided to get a bit crafty. As a graphic designer, I tend to steer clear of crafts and stick to computer generated art, but there seems to be something about haveing children and getting into the crafting world— they just go hand in hand. I decided I wanted to make her name to go on her wall. I didn’t want to paint wooden letters like I had seen before, so I decided I was going to cover cardboard letters in scrapbook paper. I thought this was going to be a big process and entirely above my skill set, but when I sat down to make her name, I was done in an hour or two! After making her letters, I got requests from friends and family… below are pictures of some of my creations. It’s quite fun, and here’s how you do it:
1. Go to a craft store and buy cardboard letters. Buy 1 piece of scrapbook paper for each letter. Also buy anything you might want to glue on top (beads, buttons, ribbon, stickers, flowers, etc.) The sky is the limit so create til your heart’s content. You will also need Modge Podge and a paintbrush. Make sure you get the Matte Modge Podge. I did a set of letters in the Gloss version thinking it might look cool (see Gavyn below) but it ended up looking less refined than the others.
2. Organize your papers by deciding which order they go in and which contrasting paper you will put on the sides of the letters.
3. Turn your letters backwards (Important!) and trace on the back of your scrapbook paper— in the corner so you don’t waste any.
4. Cut out your letter with an Xacto or scissors. Make sure it lines up on your cardboard.
5. Then measure the sides of your letters. They are usually 1 inch think. Cut strips of paper in the thickness of your letters… for example, 1 inch strips of paper.
6. Then get out the Modge Podge, cover your paper, and mold the paper around the letters until it all sticks in place. After that, paint the entire letter with one more coat of Modge Podge. Your letters might look bad at this point, especially if you bought a fancy paper with velvet or shine to it. Don’t worry, it should dry pretty.
7. Glue on any accessories you choose and Viola!— Your done!


Inspiration Bath: Apothecary Jars
April 6, 2011 § 1 Comment
I am always looking for pretty storage containers. When I came across these at my local West Elm I quickly put them on my wish list. I love how they are cleaned lined and masculine with a feminine flair on top. I also like anything with the word “apothecary” in it 😉 In fact, maybe I want both sizes… I wonder if I can think of six different things for each space… I bet I can!
Check them out here…


Vacation Living
March 30, 2011 § 6 Comments
One of my favorite places in the world to be is at a spa. Not just any kind of spa, but the relaxing, I’m-on-vacation type place with the beautiful outdoor pool area. Then I would flip through catalogs and I see the breathtaking outdoor living spaces, and I so desperately wanted to have a place like that of my very own.
At my old house, our backyard became a place to keep all of our junk— the broken toys sinking into pools of mud and grass and the wooden furniture rotting away in the hot Texas sun. It would be easy if we lived in California… or somewhere north where at least we had half the year to enjoy perfect weather. But in Texas, you see, it’s very hard to create a space like this. The weather is so extreme that you only have a few weeks in the spring and a few weeks in the fall to put out all of your nice stuff before the heat, tornadic winds or random ice storms destroy everything. I was determined when building our new house to make a Texas-proof backyard that still had a vacation-like feel.
It’s been 2 years since we moved in and I never quite got around to it. Here are the “before” shots (eek, the weeds were the worst part!):


A few weeks ago, my husband went on vacation, so I decided to surprise him with a finished backyard retreat. In my head, the one thing that makes the outdoors go from same-old-same-old to dreamy is outdoor curtains. I mean, you could install outdoor curtains on just about anything, and bam!— you’ve got yourself somewhere peaceful and relaxing. So, that was a major priority. Another priority was to have a box to put all the outdoor “junk” in… pool floaties, toys, cleaning stuff…. random things lying around the yard really mess up the whole “retreat” feel. And, I wanted a comfortable place to sit with friends. I had a metal table with feet that EVERYONE would stub their toes on as they walked by— not very comfortable. Finally, I wanted to top everything off with some greenery. I do not have a green thumb. (see most recent failure below) I can’t keep anything alive in 110 degree heat. Because of this I decided to choose cactus-like plants that didn’t look too cactus-y.

With some help from friends, we pulled it all together and Presto!— Here are some after shots:

Things to spice up a backyard:
1. some way to create fire
2.fabrics
3.plants

Notice the cute wall clock a friend gave us at the top of this picture 🙂

Yay! The Weeds are gone! And here I chose a Yucca plant because it can survive freezing and 100 degrees and you don’t have to water it. Of course, if you have a green thumb, a prettier plant would always be a nicer touch…

I took a rug from indoors that I don’t care about and put it outside… it makes it much more homey. I also added a place to put ice and cold drinks in for the next party.

In the back of this picture you can see I planted fruit trees. Hopefully in 4 years I will have my first crop 😉
Who wants to go for a swim??
New Products Galore!
March 26, 2011 § Leave a comment
The Spring Line for Life on Paper Co is here!
Organizing just got personal.
Check out our 9 new products with 10 different designs… that’s over 90 new combinations available! There are address labels, nameplates, bookplates, expiration labels and spice labels. The best part about this new line of stickers is that everything is personalized. You can choose the name and coordinating text to go along with it. These make great gifts, too! Click here to enter the shop.


New FREE Worksheet! For a Clean House….
March 8, 2011 § 5 Comments

Just in time for your spring cleaning urges— a worksheet you can follow step-by-step throughout your house. This is the order in which I clean, which is by task. For example, I do all the bathrooms at the same time and move in phases throughout my house. It seems to go faster this way because I am focussed on one thing at a time and am not constantly searching for cleaning supplies I set down in another room or which rooms I’ve already vacuumed, etc. It is also nice if I happen to run out of time because the whole house is generally cleaner whenever I have to stop, instead of having one sparkling room while the others are still in the state of disaster they were previously in.
What is your house cleaning style?
Go download this worksheet here: http://www.lifeonpaperco.com/lifeonpaper/Worksheets.html
Inspiration: Sycamore Street Press
March 5, 2011 § 1 Comment
Aaaahhhhh, Letterpress.
The art of ink pressed into beautiful papers. I really can’t get enough of it. Maybe I love it so much because it is a lost art in this digital world, but I love how it is still alive (and more creative than ever) in small shops across the country.
One shop I came across recently is Sycamore Street Press. I like this one especially because their designs are so creative, their color palette makes me smile, and they are very green in the way they do things. Take a look at some of their beautiful work:


Kids, clean your own mess!
February 28, 2011 § 14 Comments

Now that I have a very capable 4 year old on my hands, I’ve come to the conclusion that I can no longer let her get away with not cleaning her room. I am a crazy-organized mom so I actually prefer to do it myself. Nothing drives me more up the wall than blocks mixed with princess shoes mixed with strawberry shortcake— all in the same bin. I mean, how can she play like that?!? But really, there had to be a system that she could relate to so that her toys stayed picked up AND in a spot where she could find them again.
I don’t know about your 4 year old, but mine can’t read yet. So, I decided that putting pictures on every bin would enable her to know the correct spot for things. I even went as far as to use the actual toy in the picture so she wouldn’t be confused. I also added the written word with it so she could begin to recognize the word with the picture.
I am happy to say that after showing her how, she has really caught on to this concept. It is actually has become a game for her— sorting things in the bins that match the picture. YES!!! I’ve attached the labels below that I used. They print correctly on Avery 8160 labels or compatible ones. I just used pictures from the ToysRus site, so it’s probably not very legal to actually call these a printable. So, they are on my page and I am not calling them anything… just an example to do with as you wish in the privacy of your own home. 🙂


